Search

Thursday, April 27, 2017

Is it Time to Break Up with Your Beauty Blender?

We understand the attachment to your beauty blender – they’re expensive and once you find one that works perfectly you’re reluctant to give it up. But did you know that not replacing your sponge can damage your skin?

We’ve done the research to find everything you need to know to extend the life of your tools and protect your skin. Read on, and see if it’s time for you to break up with your beauty blender.

When should I replace my sponge?

On average, a blending sponge lasts two months. This is assuming you use it daily and take good care of it. Sponges that have never been cleaned are likely to start failing after a month.

We’ve already shared our thoughts on cleaning your makeup brushes. The same rules go for your blending sponge. This is one of those tools that is often overlooked when it comes to cleaning. However, cleaning it regularly can extend the life of the sponge by as much as thirty days.

How does cleaning my sponge make it last longer?

Like the bristles on your brushes, your sponge absorbs some of everything it touches. This includes foundation, moisturiser, and the natural oils on your skin. While these things aren’t inherently bad, leaving them to sit on your sponge for months at a time creates a breeding ground for bacteria.

Every time you use your blender, you spread this mix on your face. Ew, right? To prevent your face from break outs and rashes, clean your sponge after every use. If you don’t have time for a proper soak, quickly rinse the sponge under warm water. Make sure no more product comes out of the sponge before you stop rinsing.

Once it’s been washed, let it airdry. Putting your sponge away in an airtight place – like your makeup bag – encourages the growth of the very bacteria you were trying to get rid of. Worst case scenario, your sponge will grow mold.

Is it time to break up with my blender?

There are some pretty obvious signs that your love affair with your blender has come to an end. For example, if bits of it start to fall off when you use it you should toss it ASAP. Of course, some of the signs are not quite as clear.

If you notice that your sponge has a slightly musty smell after it dries, it is definitely time to get a new sponge. This smell means the sponge has absorbed some of the water and isn’t able to get rid of it all. A perma-damp sponge is likely to develop microbes.

Another sign is that the colour has faded. If your sponge is no longer the same colour it was when you got it, you know it is starting to deteriorate. Some colour loss is normal – after all, the dye doesn’t last forever. However, if you notice that the colour is off or that the sponge has taken on the colour of your products and it won’t come out when you wash it, it’s time for you to chuck it.


Keep an eye out for breakouts. Pimples that pop up unexpectedly may be a reaction to the germs on your sponge. The bacteria and residue on the sponge can easily clog your pores and create breakouts. 
Washable sponges - $5

If it's time for a breakup, we've got your back. Our package of four washable cosmetic sponges is only $5. These heart-shaped sponges are the perfect shape - the rounded ends blend seamlessly while the point gets into the tricky areas around the eyes and nose. 

Show now at www.orchidoak.com 


Wednesday, April 26, 2017

Wearing Pink Without Looking Like a Toddler


We received the following question at customerservice@orchidoak.com from a reader of the blog:

"I saw the article about using pale coloured accessories for a spring look. I want to make my closet more springy but I look like a child when I wear pink accessories so how do I make things lighter for spring without doing this?"

First of all, this is a common problem. I've had this issue myself, and I know how frustrating it can be to try a trend and end up feeling ridiculous (cue awkward pictures of me trying to be boho). There are several things you can try that will lighten your look without getting you mistaken for a kindergartener.

Avoid bubblegum pink.

There is nothing quite like wearing Double Bubble pink to make you feel five years old again. There are tons of shades of pink to choose from so don't limit yourself to just one.

Start with a rich tone if you are uneasy with the idea of pink. Jewel tones are much more mature than pastel ones so they are a good starting point.


Choose jewellery with pale accents.

Jewellery tends to be more subtle than other items like purses and shoes. Pieces like earrings and necklaces can easily be worn in the warmer months by choosing styles that have lighter colours. For example, turquoise studs scream "beach holiday" without also saying "floaties".

Alternatively, long necklaces add some glam to a casual look like a tank and shorts. Try one with a pastel pendant to inject some spring into your style.

If chunky bracelets and statement necklaces are more your style, pick one that has a light base like chains. A cuff will quickly become sweaty which will make you uncomfortable. Chains with accents like pearls or stones such as opals are visually lighter than chunky pieces but still stand out.


Try a cool shade for your purses.
Mauve clutch, $40

You're right that pink tends to be seen as a very youthful colour. Instead of pink, try a cool tone like pale blue or mauve. These tones aren't quite as young as pink but still offer some lighter colour.

The style of your bag will also impact how young you look. Remember being six and having a tiny purse on an extra long strap? Wearing that style as an adult will conjure those memories.

Instead, opt for either a clutch or a handbag. Clutches are perfect for spring and summer evenings out, while handbags can hold everything you need for a day on the go in the sun.

If you want to step outside the colour zone, try a white or nude bag. These colours are ideal for warmer months because they are light and go with everything.

Pro tip: If you plan on carrying a white bag, pack a Mr Clean Magic Eraser, a packet of tissues, and a small water bottle. White attracts dirt and every speck will show up on your bag. Magic Erasers are perfect for getting rid of smudges that appear on white bags. Use a tissue to wipe off the residue,


Try a coloured flat.

If you're like me, your go-to colour for flats is black. They're great for work and you can wear them with everything.

Trade in your black flats for a pink pair. Choose a dusty rose shade to avoid feeling like you escaped a ballet class. This tone will mix well with neutrals such as nude, brown, navy, and white. To pull the look together, try a piece of jewellery with an accent in a slighter darker shade of pink.


If you have a question you'd like answered, send it to customerservice@orchidoak.com or leave a comment here!


Wednesday, April 19, 2017

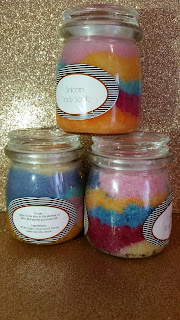
Unicorn Body Scrubs Are Here!

Get yours at www.orchidoak.com 
Unicorn scrubs have arrived at Orchid & Oak.

These limited-edition body scrubs are only $10 CAD, so get yours before they're gone.

Each scrub is made by hand so no two bottles are the same. They are also made from natural ingredients so you don't have to worry about chemicals. 

Monday, April 17, 2017

3 Steps to Get a Spring Wardrobe


A new season means it’s time to switch up your style! Now that the weather is getting warmer you can bring out pieces that you haven’t worn in months.

Fortunately, a new style doesn’t mean you have to break the bank. Here are three easy tips to getting a new spring style that won’t depress your wallet.


1 – Trade in some of your black items.

Take it from someone who’s wardrobe is 85% black – spring is the best time to introduce some colour to your look. With warmer temperatures and longer days on the horizon, black is a bit dark for spring.

Single button blazer - $48
Try trading some black items – like blazers, shirts, and scarves – for coloured items. If there is a particular colour you like, such as navy blue, try a lighter version of that shade. For example, royal blue, teal, and mint are variations of blue that look amazing in the spring.

Dark neutrals like grey, navy, and brown are still great options. They are lighter than black and will go with a variety of colours.


2 – Bring your accessories into the loop.

More often than not, my purse is black. It started as a way to always have a bag that goes with my outfit, but somehow it evolved into a staple of my wardrobe. There’s something about a large black purse that says, “I can fit my whole life in here”.

Pastel tote - $50
Also available in pink.
In the fall and winter, this is a fantastic feature. I can carry all the usual things like wallet, phone, and makeup bag, but I can also stuff my gloves, scarf, and hat in there. Plus, the black bag goes with my black boots.

When spring rolls around, include your bag in your purge of dark, heavy items. Not only will it give you a chance to clean out the receipts and gum wrappers from the bottom (just me?) but you’ll end up with a cohesive spring style. Black accessories clash with light spring colours.

If you aren’t ready for a brightly coloured or white bag, try a nude tone. Tan, greige, and deep nude are all suitable for spring.


3 – Ditch the full-length pants.

Long pants are necessary for the winter, especially here in Canada. Once summer rolls around, shorts are my go-to. However, there needs to be something for the in-between stage that is spring. Enter capris.
Skinny denim jean - $46

Unless your work dress code states otherwise, capris are suitable for work. Shorts are usually far too casual for any office, but capris are the perfect compromise between full-length pants and shorts. You can dress them up with a pair of heels or strappy sandals, or opt for flats for a classic spring style.


An easy way to transition your favourite skinny jeans from winter to spring is to roll up the bottoms. Flip up the hem about an inch, and make sure it doesn’t bunch in the back. Flip them up one more time, and you are good to go. This gives your jeans a casual but cute flair. 

If you like the items you see here, you can get them all at www.orchidoak.com

Tuesday, April 11, 2017

How to Get a Natural Eyebrow


Recently the eyebrow trend has taken a turn. You may have seen the ads online for an “eyebrow stamp”, which promises to give you a perfect eyebrow in seconds without struggling to pencil them in. We thought this was a joke item, but it turns out this is a real product.  

This got us thinking – are eyebrows hard to get right? We did some research and we found that if you’re trying to achieve the highly arched, super matte brow with sharp corners then it is in fact difficult.

However, a more natural shape isn’t hard to do (think Emma Watson). Here is our simple 3-step guide to getting a natural brow.

What You’ll Need:

Tweezers
Eyebrow Comb
Eyebrow Powder
Small, straight brush
Q-tips

Step 1 – Comb and Tweeze Your Brows

To begin, comb your brows in the direction the hair grows. This will smooth any stray hairs and remove any loose strands.

Use the tweezers to pluck any hairs that are outside of your natural brow line. If you aren’t sure where that is, use your finger tips to feel along where the majority of your eyebrow hair is. You should be able to feel the bone protruding slightly. Any hair that grows along this line is your natural eyebrow.

Be careful not to overpluck. Go slowly and take one or two hairs at a time. It is much easier to go back and remove more than it is to try and replace the hair you took off by accident.
To create an arch, pluck a few extra hairs from the middle of your brow. Only pluck the hairs underneath the brow. Removing the ones from above the middle of your brow creates an unnatural shape.

Tip: Do both brows at the same time. Make sure that whatever you do to one brow you also do to the other. This will ensure that your brows match. If you do one completely and then move to the other, you run the risk of doing something different.

Step 2 – Apply the Powder

A lot of the tutorials we saw suggested using wax, gel, or an eyebrow pen. In order to achieve a more natural look, use powder. It is softer than other mediums, making it appear less harsh once your brows are done.

To start, dip a brush with a small, straight head into the powder. Compressed powder is easiest to use and less messy than loose powder. Gently blow on the brush to remove any excess.

Use small strokes to apply the colour to your eyebrow hair. Press lightly to prevent putting too much colour in one spot. Start with the inside part of your eyebrow (by the bridge of your nose). This is the widest part of the brow so it will need the most powder.

Do not refill the brush to apply colour to the end of your brow (the part furthest away from your nose). Since this part is so thin, too much colour will make it appear artificial.

Tip: Choose a colour one or two shades lighter than your natural eyebrow colour. Using a shade that is too dark will cause your eyebrows to be significantly darker than your hair.
 
Step 3 – Touch Up with Q-Tips

Q-tips are the perfect beauty tool. If you’ve coloured outside the lines, smudged the powder, or gotten a few specks on your cheeks, use a Q-tip to gently clean it up.


Tip: Make sure the Q-tip is dry. Getting it wet will smear the powder, creating a bigger problem. 

Need the brushes we mentioned? Our 7-piece  brush set is only $17. Visit www.orchidoak.com to get yours!

Friday, April 7, 2017

How to Rock a Red Lip at Work


When you want to dress up your work style, a red lip can really hit the spot. Often this trend is associated with date night or girl’s night out, but it doesn’t have to be. With a few tips, your favourite red hue can be work appropriate.

Here is everything you need to know to rock your red lip at work.

1 – Keep it bright.

Not every skin tone is suited to a cherry red tone. Be sure to select the shade that is best for you, but keep it as light as possible.

Dark undertones of blue or purple are dramatic and perfect for evening, but when it comes to a Tuesday morning they can be a bit much. Instead, opt for a brighter shade that still complements your skin tone.

2 – Don’t skip any application steps.

Before you apply the actual lipstick, there are a few steps you should take to prep. 

First, exfoliate your lips. This will give you a smooth surface to work with. When you cleanse your face in the morning, gently rub a wet facecloth over your lips in small circles. This will buff them and remove any dead skin. Apply a thin coating of a hydrating lip balm.

Second, dab on a tiny bit of primer. Smooth it into your lips to give your lipstick something to hold on to. This will prevent it from rubbing off too quickly during the day. It will also add some moisture.

Third, line those lips! Lip liner prevents the colour from bleeding off your lips. Make sure the colour of the liner matches the shade you are applying. If you don’t have one that matches perfectly, try one that is lighter rather than darker. A lighter colour can be masked with the lipstick, whereas a darker liner will stand out.

Lastly, apply your lipstick. Start with your lower lip. Press your lips together to spread the colour, then carefully fill in the cupid’s bow on your top lip. Don’t forget to blot – this gets rid of any excess colour.

3 – Leave the rest of your makeup simple.

It’s easy to overdo your look when you have an intense lip colour. To prevent your face from looking like you are going to a club, keep the rest of your makeup simple. Adding a smoky eye, lots of bronzer, or a bright blush will overpower the red lip, creating a look that says, “I forgot I was going to work”.


For a classic look, try a thin line of black eyeliner and a few coats of mascara. For those of you who like to mix it up, try a coloured liner like navy blue, forest green, or a deep plum. Just make sure the liner isn’t too thick. 

If you have a tip you'd like to share, comment here!

Wednesday, April 5, 2017

Enter to Win Free Tickets!

On June 3, 2017, we'll be at the Head2Toe Women's Show!  This event will be packed with over 50 vendors offering products for beauty, fashion, and jewelry.

It's also got a cash bar, fashion show, and door prizes! If you'd like to attend, check out facebook.com/Head2ToeWomensShow for details.

We've got FIVE pairs of free tickets to give away!

In addition, each winner will also receive a coupon for 20% off their entire Orchid and Oak purchase. To enter, head over to our facebook page facebook.com/OrchidOak and comment or message us with your favourite thing about spring style.

NOTE: You must be 19 or over to win, and must be in St. John's on June 3, 2017, to attend the event.